The Windows operating system has various services running in the background that allow the smooth running of applications on the PC. One such service is the gameinputsvc.exe also called the Microsoft GameInput Service.
It ensures the gaming peripherals connected to the computer such as the mouse, keyboard, and specific game controllers are functioning correctly. The service manages the user input provided through the connected gaming peripherals ensuring that they are correctly being executed on the concerned gaming app.
Sometimes, the GameInput Service stops working on Windows 11. As a result, the game you are trying to play hangs up and crashes. The PC screen freezes and you have to start all over again. This guide explains the various troubleshooting tips to fix problems with the GameInput Service on Windows 11.
Top Ways to Fix Microsoft GameInput Service Error on PC
Use these fixes to solve the problematic GameInput service on your Windows PC to continue gaming without any crashes.
1. Stop and Restart the GameInput Service
Any problem with Windows services can be often resolved by momentarily pausing it. Then restarting the service should fix the crashing issue.
- Press Windows + R to launch the Run box.
- Type services.msc and press enter to access the Windows Services.
- Scroll to GameInput Service.
- Right-click on the service and select Stop from the menu.
- Resume the service by right-clicking on GameInput Service and selecting Start.
2. Delete the Microsoft GameInput Folder
Some files on the GameInput Service may have become corrupt. That may cause the service to crash and stop you from enjoying your game. Access the Microsoft GameInput folder within the system directory and delete it. It will remove all the corrupt data in the folder.
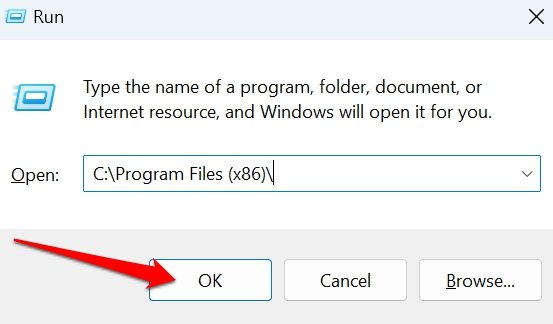
- Use the hotkeys Windows + R to bring up the Run box.
- Type C:Program Files (x86) and press enter.

- Go to the Microsoft GameInput folder and select it.
- Press Shift + Delete to delete the folder and its contents.
3. Uninstall Microsoft GameInput from System Apps
You can temporarily uninstall the Microsoft GameInput service from Windows settings. Don’t worry; the service will automatically be reinstated when you restart the PC.
- Press Windows + I to access the PC settings.
- Click Apps on the left column.
- Go to Installed Apps.
- Use the Search Panel to look up Microsoft GameInput.
- Once you see it in the search result, click the 3-dot icon and select Uninstall.
- Press Uninstall on the prompt to confirm.
- Restart the PC.
4. Restart the Computer
Restart the PC and check if that solves the app/system crashing issue caused by the GameInput Service. Often random issues can be fixed right away with a reboot.
- Press the Windows key on your PC keyboard.
- Click the Power icon and select Restart.
- Once the PC restarts, launch the game.
5. Fix the Corrupt System Files
Some system files may have become corrupt due to problems arising from failed system updates or botched application installation. Engage the command prompt and execute the SFC and DISM commands to fix the corrupt system files that may be causing the GameInput Service to crash.
- Press Windows + R to bring up the Run box.
- Type cmd and press enter to launch the Command Prompt.
- Insert this command and hit the enter key.
sfc/scannow
- Next, execute these commands one after the other.
DISM /Online /Cleanup-Image /CheckHealth

DISM /Online /Cleanup-Image /ScanHealth

DISM /Online /Cleanup-Image /RestoreHealth
Restart your PC once the commands fix the corrupt system files. Now, the GameInput Service won’t crash.
6. Close the Game and Start Again
It is one of the common troubleshooting methods implemented by everyone when an app they are trying to access malfunctions or freezes/hangs up due to some technical issue(dysfunctional Windows service in this case). Close the game from the Task Manager and launch again.
- Press Ctrl +Shift +Esc to launch the Task Manager.
- Access the game app and right-click on it.
- Select End Task.
- Launch the game app.
7. Install Windows Update
Tried all the above tricks and still your game crashing on Windows 11? The problem may be in the system version of Windows 11 installed on your PC. It could be a bug that needs to be patched. Look for new system updates in the Windows settings and install them.
- Press Windows + I to go to the settings.
- Click on Windows Update.
- Next, click Check for Updates.
- Follow the instructions on the screen to finish installing the new update.
- Restart your PC and launch the game.
Check if the system is hanging up or the game is still crashing. If the problem was with a system bug, upgrading to the new build should fix it for good.
Bottom Line
Windows Services are vital in managing the seamless syncing of hardware and the operating system. If a specific service is not working and prevents you from using an app, fix it immediately. The tips and tricks shared in this guide should help you resolve the Microsoft GameInput crashing issue.
If you've any thoughts on How to Fix Microsoft GameInput Service Not Working on Windows 11, then feel free to drop in below comment box. Also, please subscribe to our DigitBin YouTube channel for videos tutorials. Cheers!


