

When you select the Windows Spotlight theme—one of the several themes that come with Windows 11—a learn about this image desktop icon will appear.
The desktop icon that says “learn about this picture” is there for a reason. It lets you rate the theme you downloaded and get more details about it.
Because Windows Spotlight offers changeable wallpapers, most people find it more appealing. However, you may remove the Learn About This picture icon if Windows Spotlight isn’t functioning or you don’t want it for aesthetic reasons.
What is Windows Spotlight?
Introduced in Windows 11, Windows Spotlight has also been included in the latest Windows 11 iteration. Powered by Bing, Spotlight uses Microsoft Bing to download pictures and adverts, which are then shown as background wallpaper on the lock screen.
It features a fresh image every day and periodically makes suggestions on the lock screen to improve your productivity and pleasure with Microsoft products. You can customize your lock screen with a picture, a slideshow, or a Windows Spotlight image.
Spotlight adds an icon called Learn more about this picture when selected as your desktop backdrop. The Windows Spotlight desktop icon displays additional information about the currently selected image. Even with stock wallpapers, this is effective. Additionally, the icon features a context menu that allows you to vote up or down on the current backdrop image and move to the next one.
Ways to disable the Learn about this picture icon in Windows Spotlight
If you do not want the Learn about this picture icon to appear on the Lock Screen in Windows 11, follow these simple step by step procedures to quickly get rid of it.
Disable Windows Spotlight using the Settings App
The procedures to disable Windows Spotlight locally on a Windows 10 or 11 PC are as follows.
- Log into your Windows 11 machine with your user account.
- Use the Windows + I shortcut to launch the Settings app.
- Next, choose Personalization from the left pane of the Settings menu.
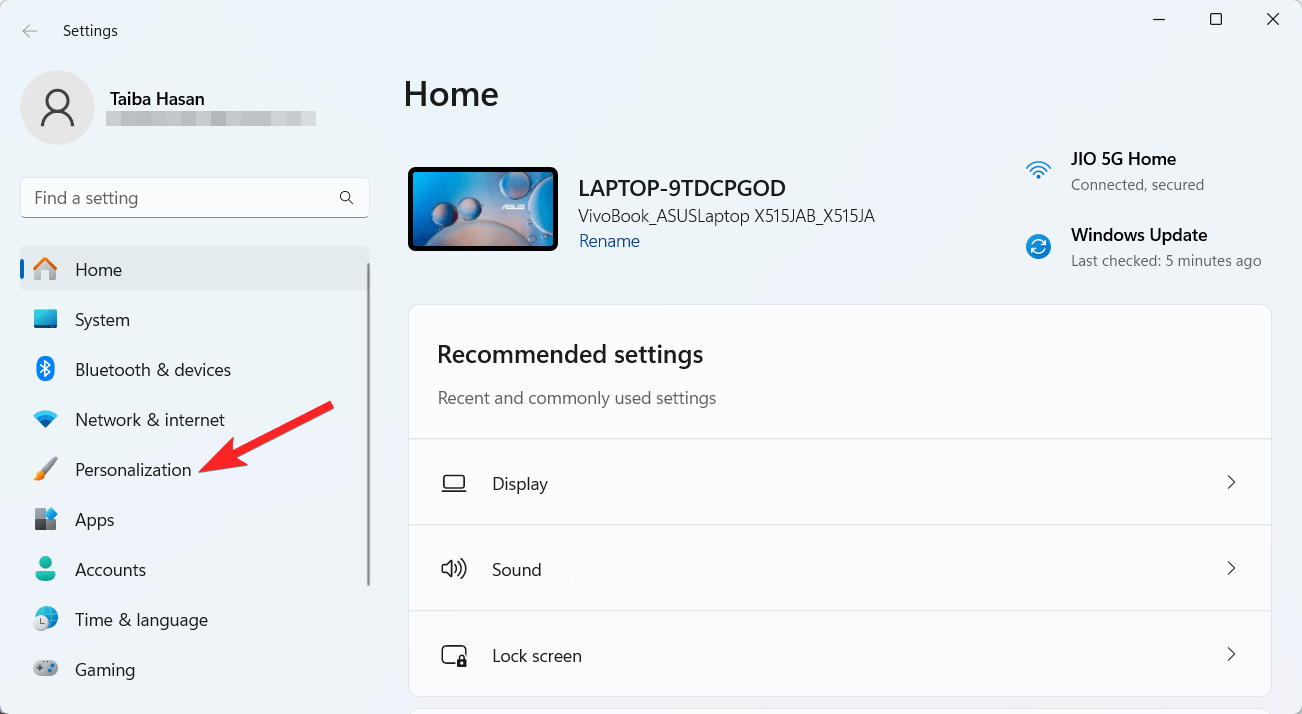
- Now click on Lock Screen displayed on the right section.
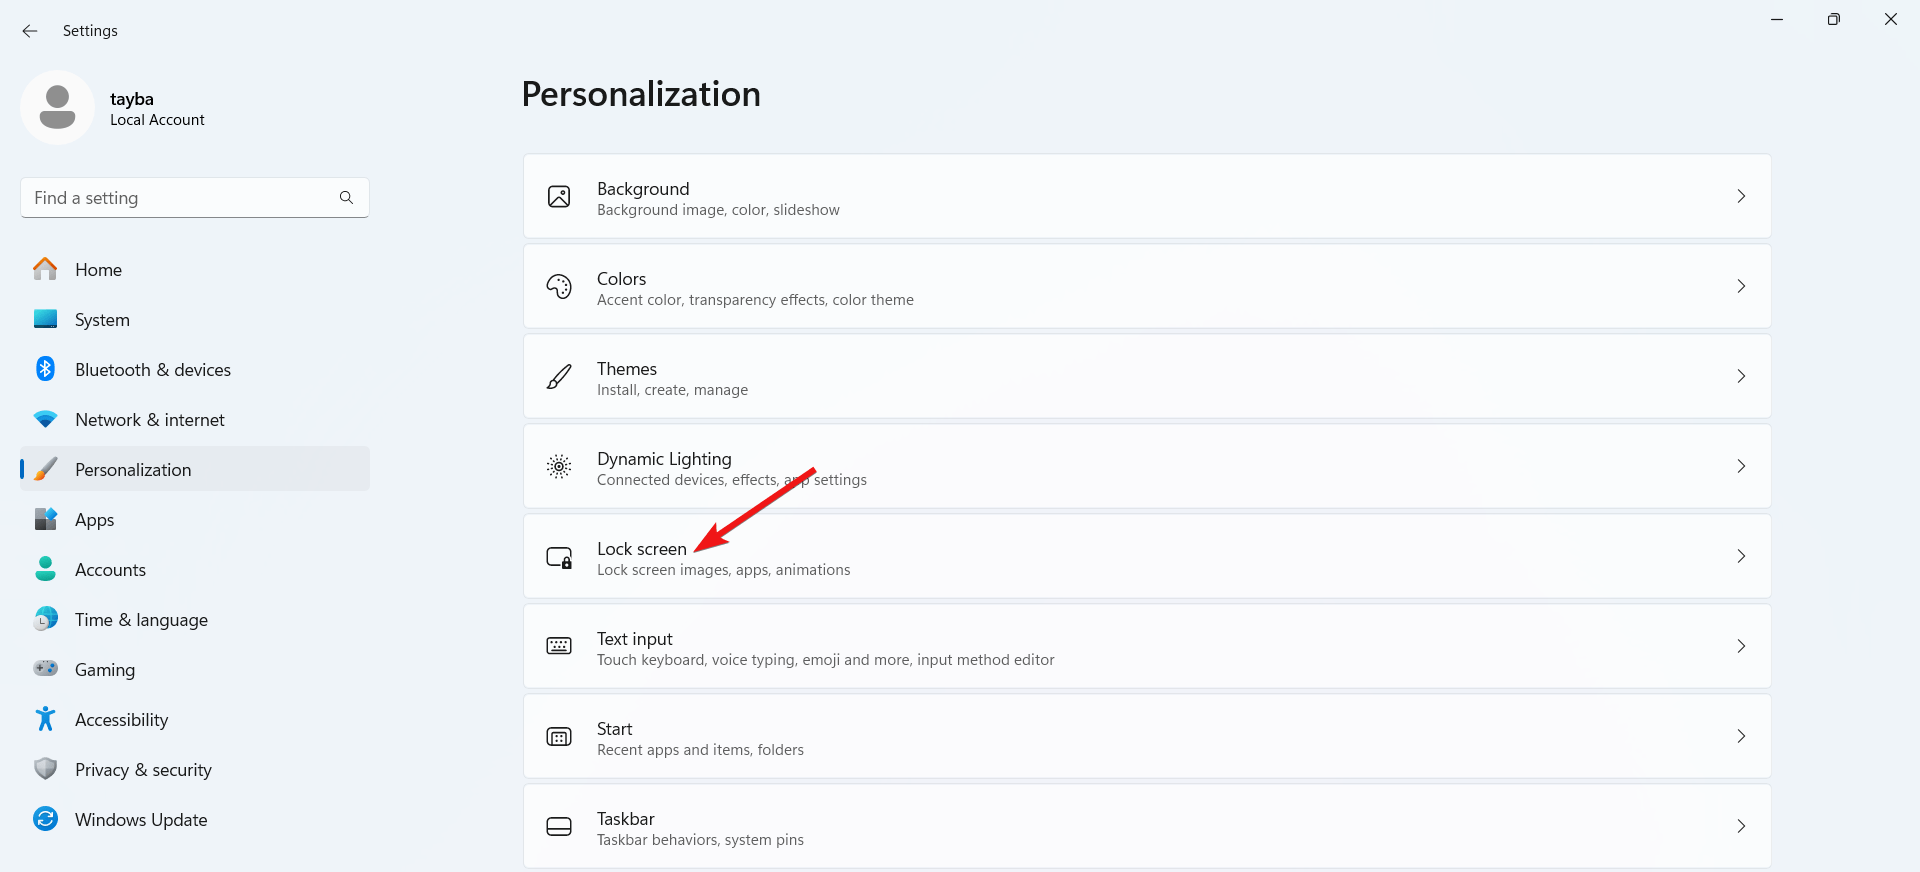
- Click the Personalize your lock screen menu to expand it and select Picture instead of Windows Spotlight.

That’s it! Windows Spotlight will now be disabled for you, and as a result, the Learn About This Picture icon will not be visible on the lock screen anymore.
Using Registry Editor
Before making any modifications, backup your Registry or establish a restore point, as making incorrect modifications to the registry might make your computer unstable.
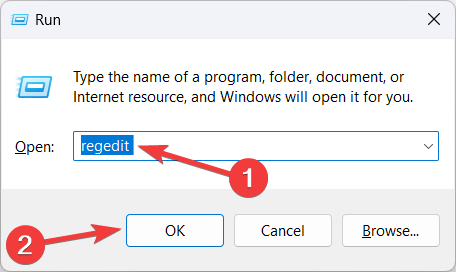
- Use the Windows + R keys to launch the Run command. To open the dialog box, enter regedit and hit Enter.
- Navigate to the address shown below:
HKEY_CURRENT_USERSoftwareMicrosoftWindowsCurrentVersionExplorerHideDesktopIconsNewStartPanel
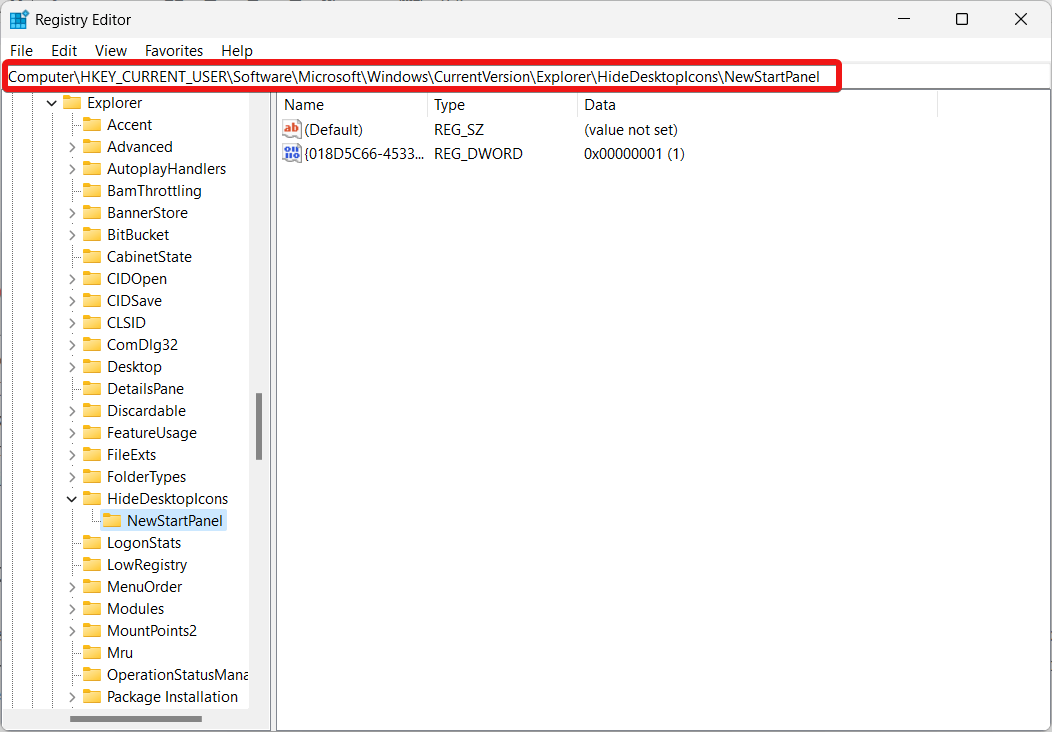
- Right-click in the right panel and choose New from the context menu, followed by the DWORD (32-bit) value from the submenu.
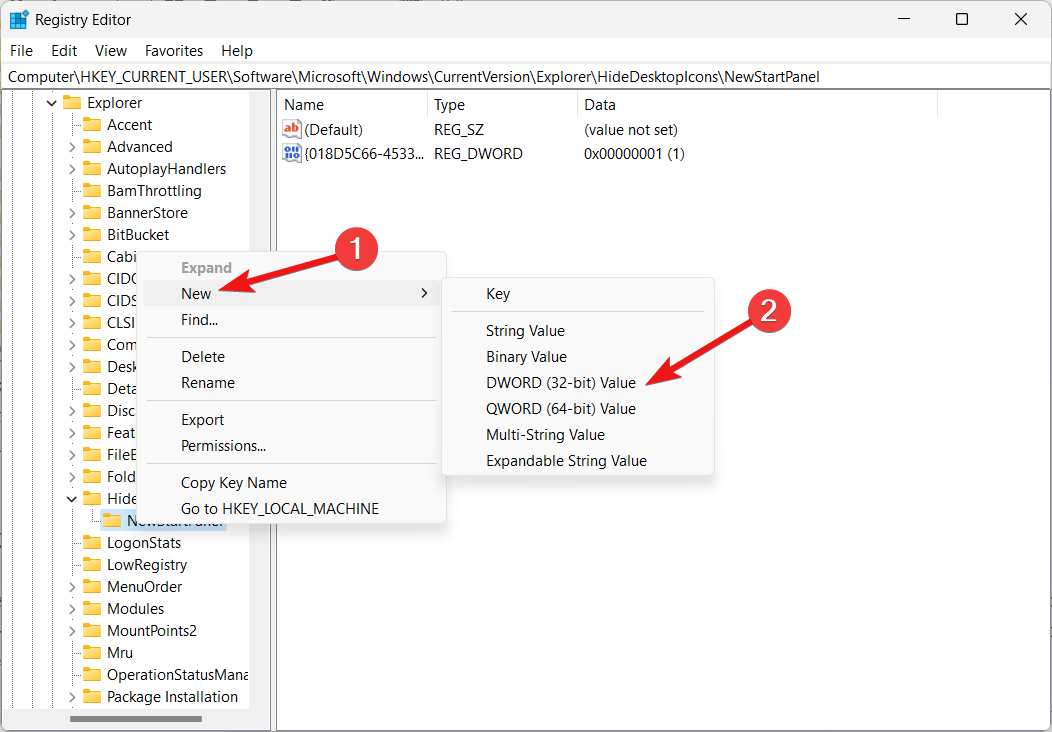
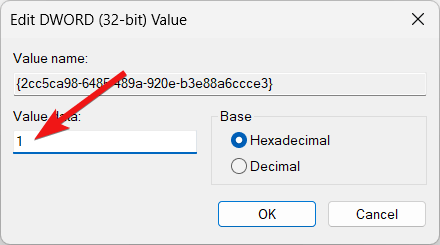
- Rename the DWORD(32-bit) value and give it the name {2cc5ca98-6485-489a-920e-b3e88a6ccce3}
- Double-click the DWORD(32-bit) to modify it and then type 1 in the Value Data field to turn it off.
- After this, exit the Registry Editor to ensure that the modifications take effect and reboot your PC.
Remove the Learn About this Picture icon using a Third-Party App
If you want to use the Windows Spotlight as your desktop backdrop and at the same time, remove the Learn more about this picture icon from your desktop, a third-party program called ExplorerPatcher will come in handy. Here are the steps to remove the Learn about this Picture icon using Explorer Patcher software:
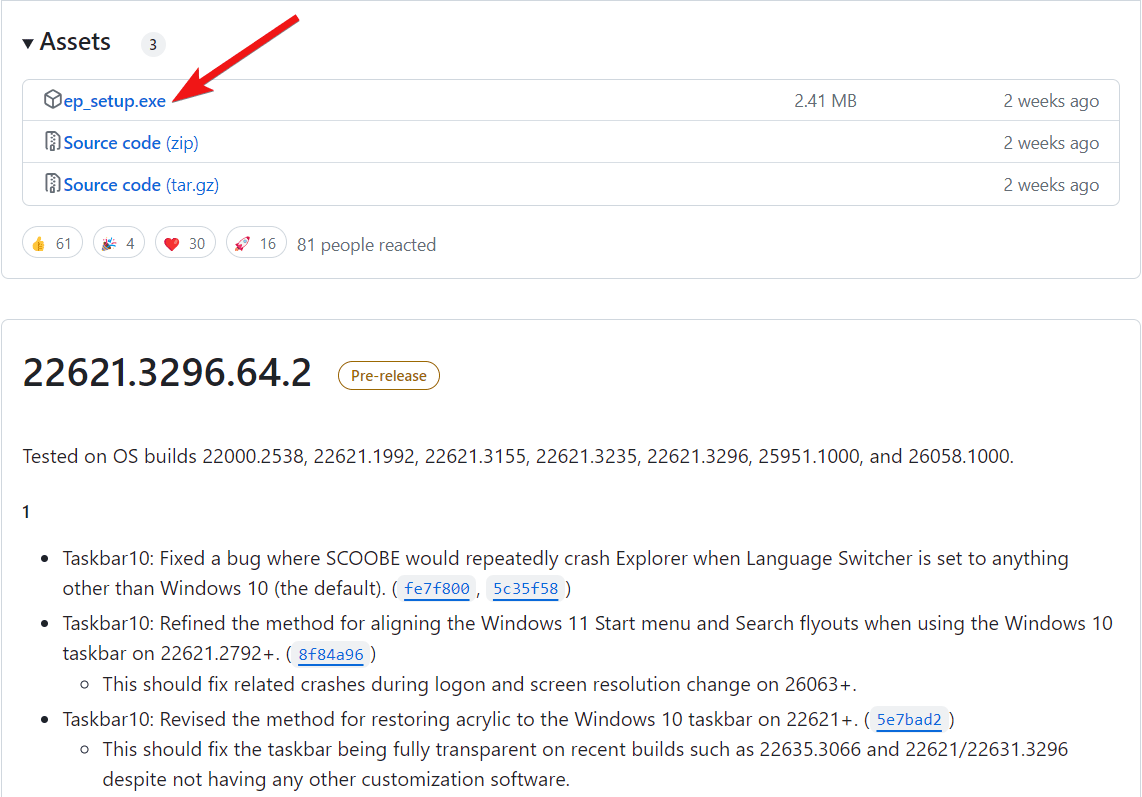
- First of all, download the most recent version of ExplorerPatcher after visiting the official download source of the software from GitHub.
- Once done, launch the setup file by double-clicking on it. If the installer does not launch this way, right-click the installer and choose More info, followed by the Run Anyway option.
- After Explorer Patcher is installed, the Learn more about this picture icon will disappear from your desktop.
If you wish to remove the ExplorerPatcher from your Windows 11 PC, you can do so by going to Windows Settings using the Windows + I shortcut. Now select Apps from the left panel, followed by Installed apps, and then choose Uninstall from the context menu of the app.
Conclusion
You’re done now. Whichever way you choose, the Learn about this picture icon will disappear from the sign-in and Desktop of your Windows 11 PC. However, when utilizing third-party apps or editing the registry, we advise you to back up your work before making any changes. If you wish to bring back the Learn about this picture icon, simply undo the changes you made on your PC. In case you require any further assistance, feel free to reach out in the comment section.
If you've any thoughts on How to Remove the ‘Learn More About this Picture’ Icon in Windows 11, then feel free to drop in below comment box. Also, please subscribe to our DigitBin YouTube channel for videos tutorials. Cheers!


